3,890 products added recently
Pre Reading Graphic Organizers
Set the stage for effective reading by using pre-reading graphic organizers that engage students' existing knowledge and curiosity. This collection includes KWL charts, anticipation guides, and vocabulary previews. By employing these tools, you can improve engagement and understanding from the outset.

PLOT: The FIVE Elements of a Story Graphic Organizers
ELA, Reading, Reading Comprehension, Language Development, Pre-Reading, Writing, Not Grade Specific, Teacher Tools, Graphic Organizers
This is our PLOT section of our Graphic Organizers Series: The FIVE Elements of a Story. In this set, you can enjoy 10 custom graphic organizers for Plot. These graphic organizers can be used in any classroom, for any grade, and with any student. Use these graphic organizers to help students gain an understanding of Plot in a story. Each graphic organizer comes with instructions on how to use them. Plot Graphic Organizers: Plot Pyramid – Complete this classic Plot Pyramid graphic organizer by writing the Introduction of the story in the bottom left box. Then, describe the Rising Action, followed by the Climax of the story. Finish up with the Falling Action and the Resolution or Conclusion of the story. Sequence – Describe events from the story in sequence. Start off by writing the Initiating Event, or the event that starts off a chain reaction, in the top box. Follow this with the Steps that directly result from this event in order that they occur. Finish up by writing the Final Outcome of this event. Prediction Chart – In the first column, write down what you predicted, or thought would happen in the story. In the second column, write down what actually happened in the story. Continue this format for each event you predict will happen in the story. Storyboard – Illustrate the plot or an event from the story. Draw or describe in detail each stage in the plot or in an event that takes place in the story. Remember, the order of plot development is: Introduction, Rising Action, Climax, Falling Action, and Resolution/Conclusion. Story Structure – Complete the Story Structure by identifying the Introduction, events of the Rising Action, Climax, events of the Falling Action, and the Conflict and Resolution of the story. Then, identify the theme of the story, as well as the setting of the story (where and when the story takes place). Sequence Chain – Describe up to 9 events from the story in the order that they occur. Write the first event in the first box, followed by the second event in the following box, and so on following the chain. It is not necessary to fill in every box with an event. For an extra activity, draw each event in detail. Prediction Tree – In this Prediction Tree graphic organizer, write your question at the base of your tree. On the trunk, write down your prediction to the answer of the question posed. On the branches, write down evidence from the story to support your prediction. Story Cycle – Describe the Introduction of the story in the top right box. Following the cycle, describe the Rising Action next. Then, include the Climax of the story. Follow this with the Falling Action, and finally with the Resolution of the story. Then, describe how the Resolution relates back to the Introduction. Changes in Plot – Identify how the Plot changes throughout the story. In the first column, write down what happened in the beginning of the story. In the second column, write down what happened at the end of the story. Compare the two to show how the plot changed. Do this for every event in the story. Plot Analysis – Describe the Introduction and identify the Point of View. Describe the Rising Action and what’s being Forshadowed if relevant. Identify the Inciting Force and the Climax. Describe the Falling Action and any Suspense that is experienced. Describe the Conclusion and any Symbolism that is present.
Author Ibby Resources
Rating
Tags Study, Skills, Character, Literary, Device

CHARACTER: The FIVE Elements of a Story Graphic Organizers
ELA, Reading, Reading Comprehension, Language Development, Pre-Reading, Writing, Not Grade Specific, Teacher Tools, Graphic Organizers
This is our CHARACTER section of our Graphic Organizers Series: The FIVE Elements of a Story. In this set, you can enjoy 10 custom graphic organizers for Character. These graphic organizers can be used in any classroom, for any grade, and with any student. Included in this set are: - Character Map - Character Trait Chart - Character Feelings - Relationship Web - Character Comparison - Character Scrapbook - Character Analysis - Character Development - Character Cluster - Character Sketch Use these graphic organizers to help students gain an understanding of Character in a story. Each graphic organizer comes with instructions on how to use them. Character Graphic Organizers: Character Map - Write the name of the character in the middle circle. Then, describe the character’s actions in the top left square; what the character says and how they speak in the top right square; the character’s feelings in the bottom left square; and what the character looks like in the bottom right square. Character Trait Chart - Choose a character from the story. In the first column, write down any traits that your character has. Include physical features, personality, feelings, and anything else that describes your character. In the second column, provide evidence from the story to support your chosen trait. Character Feelings - In the top box, describe the character’s feelings at the beginning of the story. In the next series of boxes, describe an event that has an effect on the character, then how this character feels as a result of this event. In the last box, describe the character’s feelings at the end of the story. Relationship Web - Write the name of the main character in the story in the middle circle. In the circles branching out from the middle one, write down the relationships the character has. Include whether you think this is a good relationship or a bad one. Do the same for any other character in the story. Character Comparison - Use the Venn Diagram to compare two characters from the story. Write the names of each character in the overlapping circles. Write any differences the characters have with one another in the outside circles. Write any similarities the characters have in the middle of both circles. Character Scrapbook - Create a scrapbook for one of the characters in the story. Choose a character from the story. Choose some important events that happen in the story that shapes the character. Draw pictures of these events and explain what happened and how it affected the character. Character Analysis - Keep track of every character in the story and their traits. Write the name of each character in the story in the first column. Write a trait that the character has in the second column. In the third column, write down the page and paragraph number of a quote that proves this trait. Character Development - Choose a character from the story. Write down their initial thought on a topic or situation in the first column. In the second column, write down the event that has an effect on that character’s thoughts. Then, write down the character’s new thoughts on the topic or situation in the third column. Character Cluster - is Cluster Map can be completed in many different ways. Start with a character in the middle triangle. Then, branch out from the character with related topics in the circles. Expand on those topics in the rectangles. Suggestions include: relationship web, traits web, feelings web. Character Sketch - Complete this Character Sketch of any character in the story by writing what the character says, thinks, hates, loves, owns, does or uses. Also include the characters strengths and weaknesses, and where the character has come from in the story, and where the character is going.
Author Ibby Resources
Rating
Tags Study, Skills, Character, Literary, Device

SETTING: The FIVE Elements of a Story Graphic Organizers
ELA, Reading, Reading Comprehension, Language Development, Pre-Reading, Writing, Not Grade Specific, Teacher Tools, Graphic Organizers
This is our SETTING section of our Graphic Organizers Series: The FIVE Elements of a Story. In this set, you can enjoy 10 custom graphic organizers for Setting. These graphic organizers can be used in any classroom, for any grade, and with any student. Use these graphic organizers to help students gain an understanding of Setting in a story. Each graphic organizer comes with instructions on how to use them. Setting Graphic Organizers: Setting Elements - Place + Time + Environment = Setting in this Graphic Organizer. Describe the Place that the story takes place in the house graphic. Then, describe the Time in the clock graphic. Finally, describe the Environment in the landscape graphic. Setting Stage - Draw the setting that the story takes place in on the stage in this graphic organizer. Be sure to illustrate the time and place that the story takes place in. Also include the environment of the story, and try to show the tone or mood that the setting creates for the story. Changes in Setting - Identify how the Setting changes throughout the story. In the first column, write down when and where the story takes place at the beginning. In the second column, write down when and where the story takes place at the end. Compare the two to show how the setting changed. Setting Comparison - Compare your Setting with the Setting of the story. In the first column, describe your own Place, Time, Environment, and Mood. Then, do the same for the story’s setting in the second column. Finally, compare each element of the setting. What is the same? What is different? Tone and Mood - Where + When = Tone/Mood in this Graphic Organizer. Describe Where the story takes place in the house graphic. Then, describe When the story takes place in the clock graphic. Finally, describe how both of these elements affect the Tone and Mood of the story. Setting Map - Draw a map to show where the story takes place. Include all the important places from the story as the setting changes. As an extra activity, include routes to each place as it happens in the story. Additionally, include the time for each place on your map. Be creative with your drawing. Past, Present, Future - Describe the Setting as it changes throughout the story. In the Past section, write the setting that took place before the story (flashback). In the Present section, write the current setting of the story. In the Future section, write the setting that will take place after the story (flashback). Elements of Setting - Place + Time + Environment + Mood = Setting in this Graphic Organizer. Describe the Place that the story takes place in the top left box. Then, describe the Time in the top right box. Then, describe the Environment in the bottom left box. Finally, describe the Mood in the bottom right box. Character and Setting Comparison - Compare the Characters in the story with the Setting. Write traits that the character and setting share where the circles overlap. Write traits that the character and setting don’t share in the outside circles. Do this for each character and setting in the story. Setting Analysis - Describe each element of the Setting in detail. Describe the setting, how it relates to the characters, and how the characters are in conflict with the setting. Then, identify the tone and mood of the story, how the setting affects it, and how the story would change if the setting was different.
Author Ibby Resources
Rating
Tags Study, Skills, Character, Literary, Device

THEME: The FIVE Elements of a Story Graphic Organizers
ELA, Reading, Reading Comprehension, Language Development, Pre-Reading, Writing, Not Grade Specific, Teacher Tools, Graphic Organizers
This is our THEME section of our Graphic Organizers Series: The FIVE Elements of a Story. In this set, you can enjoy 10 custom graphic organizers for Theme. These graphic organizers can be used in any classroom, for any grade, and with any student. Use these graphic organizers to help students gain an understanding of Theme in a story. Each graphic organizer comes with instructions on how to use them. Theme Graphic Organizers: Inference Clues – Infer the theme and its meaning from the story by using clues the author gives you. Write down clues to the theme in the circles. Then, find the theme based on these clues and write it in the Inference box. Discuss how you were able to come to that conclusion based on the clues from the story. Theme Prediction – Predict what you think the theme of the story will be based only on the cover art, title, and back cover description. Then, support your prediction. Follow this by writing down evidence from the story as you read along. Finally, write down the actual theme and compare this to your prediction. Theme Chart – First identify the main characters, main conflict, and theme of the story. Then, breakdown the theme of the story by first writing down the beginning of the theme. Follow this by writing the development of the theme, then the climax of the theme. Finish off with the resolution of the theme. Theme Comparison – First, write down a list of themes from the story in the first box. Then, compare these themes by writing their differences in the outside circles, and their similarities in the area where the circles overlap. Finally, write down your conclusions based on this information. Theme Tree – Complete the Theme Tree by first writing the theme on the trunk of the tree. Then, include evidence from the story to support the theme on the branches of the tree. Evidence can be in the form of quotes, paraphrasing, descriptions, and drawings. Theme Contrast – This graphic organizer helps with identifying the Theme and not getting it confused with the Plot or Main Idea of the story. Contrast the theme with the plot or main idea by comparing them and listing ONLY their differences in the two columns. Theme Connection – Connect the Theme of the story with Real Life. First, identify the theme of the story and write it in the center triangle. Then, write down examples of the theme from the story in the circles. Finally, write down examples of the theme as they appear in real life in the rectangles. Changes in Theme – Identify how the Theme changes throughout the story. In the first column, write down the theme in the beginning of the story. In the second column, write down the theme at the end of the story. Compare the two to show how the theme changes. Do this for every theme in the story. Theme Identifier – Get help identifying the Theme of a story by answering the questions. Start off by describing what happens in the story. Then, identify the most important event in the story. Explore the characters by identifying how they change and what they learn. Finally, determine what the author is trying to tell you. Theme Analysis – Identify the Theme, analyze its development, and summarize key supporting details. First, write down what you think the author wants you to understand in the triangle. Then, include supporting evidence in the circles. Finally, tell how the author communicates the theme in the rectangles.
Author Ibby Resources
Rating
Tags Study, Skills, Character, Literary, Device

CONFLICT: The FIVE Elements of a Story Graphic Organizers
ELA, Reading, Reading Comprehension, Language Development, Pre-Reading, Writing, Not Grade Specific, Teacher Tools, Graphic Organizers
This is our CONFLICT section of our Graphic Organizers Series: The FIVE Elements of a Story. In this set, you can enjoy 10 custom graphic organizers for Conflict. These graphic organizers can be used in any classroom, for any grade, and with any student. Use these graphic organizers to help students gain an understanding of Conflict in a story. Each graphic organizer comes with instructions on how to use them. Conflict Graphic Organizers: Conflict Dissection – Complete this graphic organizer by filling in each quadrant. In the first box, identify the characters of the story. In the next box, identify the time and place of the story. In the third box, identify the problem that takes place in the story. In the last box, identify the solution to the problem. Problems and Solutions Chart – Identify the Problems and possible Solutions with this graphic organizer. First, identify the problem in the first box. Then, identify possible causes of the problem, followed by possible effects of the problem. Finally, identify any possible solutions to the problem based on this information. Conflict Commentary – Summarize the Conflict by first identifying how the conflict starts. Then, identify possible causes of the conflict. At the top, identify the climax of the conflict, or how it comes to a head. Then, identify possible effects of the conflict. Finally, identify the outcome of the conflict. Internal or External Conflict – Determine whether the conflict in the story is internal or external. Internal conflict: a character experiences two opposite emotions or desires. External conflict: a character struggles with an outside force. Find examples of the conflict in the story and add them to the column that most fits. Conflict Type Chart – In the first column, find examples from the story that shows Character against Character. In the second column, find examples of Character against Nature. In the third column, find examples of Character against Self. And finally, in the fourth column, find examples of Character against Society. Conflict Timeline – Complete the Conflict Timeline graphic organizer by breaking down the events for the conflict. Write down the stages of events for the conflict in the boxes on the timeline. Each stage should follow the order in which it took place in the story. Opposing Forces Comparison – Compare two opposing forces in the story with this graphic organizer. First, identify the two forces you will be comparing. Then, identify the struggle between these two forces. List the differences between the two forces in the outside circles. List the similarities where the circles overlap. Conflict Map – Outline the Conflict in the story with this Conflict Map graphic organizer. First identify the conflict of the story in the top box. Then, identify the two forces that are in conflict with each other, and what happens when these two forces collide. Finally, identify the resolution of the conflict. Cause-Effect-Consequences – Identify the cause, effect, and consequences of the Conflict as it appears in the story. First, identify the conflict in the story in the top box. Then, in the chart, identify the causes of the conflict, the effects of the conflict, and the consequences of the conflict. Conflict Analysis – Determine what type of conflict the author created: Character vs. Character, vs. Nature, vs. Self, vs. Society, vs. Supernatural, or vs. Technology. Answer the questions to lead to the Conflict Statement. Here, identify the type of conflict, what the character wants, and why they can’t have it.
Author Ibby Resources
Rating
Tags Study, Skills, Character, Literary, Device

FREE: The FIVE Elements of a Story Graphic Organizers
ELA, Reading, Reading Comprehension, Language Development, Pre-Reading, Writing, Not Grade Specific, Teacher Tools, Graphic Organizers
This is a FREE sample of our Graphic Organizers Series: The FIVE Elements of a Story. In this sample, you can enjoy a selection of 10 custom graphic organizers for Character, Setting, Plot, Theme, and Conflict. These graphic organizers can be used in any classroom, for any grade, and with any student. Use these graphic organizers to help students gain an understanding of the five elements of a story. Each graphic organizer comes with instructions on how to use them. Character Graphic Organizers: Character Map - Write the name of the character in the middle circle. Then, describe the character’s actions in the top left square; what the character says and how they speak in the top right square; the character’s feelings in the bottom left square; and what the character looks like in the bottom right square. Character Comparison - Use the Venn Diagram to compare two characters from the story. Write the names of each character in the overlapping circles. Write any differences the characters have with one another in the outside circles. Write any similarities the characters have in the middle of both circles. Setting Graphic Organizers: Setting Stage - Draw the setting that the story takes place in on the stage in this graphic organizer. Be sure to illustrate the time and place that the story takes place in. Also include the environment of the story, and try to show the tone or mood that the setting creates for the story. Elements of Setting - Place + Time + Environment + Mood = Setting in this Graphic Organizer. Describe the Place that the story takes place in the top left box. Then, describe the Time in the top right box. Then, describe the Environment in the bottom left box. Finally, describe the Mood in the bottom right box. Plot Graphic Organizers: Plot Pyramid – Complete this classic Plot Pyramid graphic organizer by writing the Introduction of the story in the bottom left box. Then, describe the Rising Action, followed by the Climax of the story. Finish up with the Falling Action and the Resolution or Conclusion of the story. Storyboard – Illustrate the plot or an event from the story. Draw or describe in detail each stage in the plot or in an event that takes place in the story. Remember, the order of plot development is: Introduction, Rising Action, Climax, Falling Action, and Resolution/Conclusion. Theme Graphic Organizers: Theme Chart – First identify the main characters, main conflict, and theme of the story. Then, breakdown the theme of the story by first writing down the beginning of the theme. Follow this by writing the development of the theme, then the climax of the theme. Finish off with the resolution of the theme. Theme Identifier – Get help identifying the Theme of a story by answering the questions. Start off by describing what happens in the story. Then, identify the most important event in the story. Explore the characters by identifying how they change and what they learn. Finally, determine what the author is trying to tell you. Conflict Graphic Organizers: Conflict Dissection – Complete this graphic organizer by filling in each quadrant. In the first box, identify the characters of the story. In the next box, identify the time and place of the story. In the third box, identify the problem that takes place in the story. In the last box, identify the solution to the problem. Conflict Type Chart – In the first column, find examples from the story that shows Character against Character. In the second column, find examples of Character against Nature. In the third column, find examples of Character against Self. And finally, in the fourth column, find examples of Character against Society.
Author Ibby Resources
Tags Study, Skills, Character, Setting, Plot, Theme, Conflict, Literary, Device
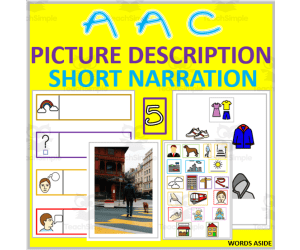
AAC | Picture Description Short Story | Visual Guide Resource 5
Special Resources, ELA, Special Education Needs (SEN), Speech Therapy, Language Development, Pre-Reading, Vocabulary, Writing, Kindergarten, Preschool, Grade 1, 2, Teacher Tools, Graphic Organizers
AAC Picture Description Short Story Visual Guide Resource 5 is an educational resource designed specifically for educators and therapists. Its main goal is improving the language development, communication, and early literacy skills of children with special education needs (SEN), speech therapy patients, as well as mainstream classroom students primarily from preschool through grade two. This resource combines various teaching aids including: Real-life pictures Color-coded sentence strips Familiar themes like WHO / WHAT DOING / WHERE / WHEN / WEATHER / SURROUNDINGS/ THOUGHTS represented on separate pages Description of clothes or individual's appearance etc. The learning journey begins with a real-life photo that serves as the basis for all ensuing activities then leverages color-coded sentence strips to help children formulate narratives around familiar themes. Additional features include descriptions of clothing worn by individuals in photos and sequential answer boards that allow narrative formation through randomized questioning. An added attribute of this resource pack is the inclusion of blank colour coded pages which invite learners to contribute creatively- customizing stories in their unique way thus strengthening their communication roots further. The AAC Picture Description Short Story Visual Guide Resource 5 offers immense flexibility - use it en masse during whole-group instruction sessions or divide it among smaller groups; distribute it for homework assignments enhancing independent thinking; make use of task cards material available within; or even creating minibooks complete with descriptive strips and boards! This package comprises 16 printable PDFs each equipped with: Sentence construction strips Narration boards & Answer cards aiming at improving children's verbal abilities+ Note: The downloaded file can be printed and laminated for use. While this tool is designed primarily for use in educational environments, it can be equally beneficial during one-on-one learning or therapy sessions at home facilitated by parents/guardians and is thus an excellent asset towards children's verbal, cognitive, social and emotional development.
Author WORDS ASIDE
Tags AAC, Picture Description, Short Story, Visual Guide, Communication Skills

COMBINED: The FIVE Elements of a Story Graphic Organizers
ELA, Reading, Reading Comprehension, Language Development, Pre-Reading, Writing, Not Grade Specific, Teacher Tools, Graphic Organizers
This BUNDLED resource includes ALL Graphic Organizers from our The Five Elements of a Story series. This set includes custom graphic organizers for Character, Setting, Plot, Theme and Conflict. An additional 5 BONUS graphic organizers are included. These graphic organizers can be used in any classroom, for any grade, and with any student. Use these graphic organizers to help students gain an understanding of the five elements of a story. Each graphic organizer comes with instructions on how to use them. Character Graphic Organizers: Character Map - Write the name of the character in the middle circle. Then, describe the character’s actions in the top left square; what the character says and how they speak in the top right square; the character’s feelings in the bottom left square; and what the character looks like in the bottom right square. Character Trait Chart - Choose a character from the story. In the first column, write down any traits that your character has. Include physical features, personality, feelings, and anything else that describes your character. In the second column, provide evidence from the story to support your chosen trait. Character Feelings - In the top box, describe the character’s feelings at the beginning of the story. In the next series of boxes, describe an event that has an effect on the character, then how this character feels as a result of this event. In the last box, describe the character’s feelings at the end of the story. Relationship Web - Write the name of the main character in the story in the middle circle. In the circles branching out from the middle one, write down the relationships the character has. Include whether you think this is a good relationship or a bad one. Do the same for any other character in the story. Character Comparison - Use the Venn Diagram to compare two characters from the story. Write the names of each character in the overlapping circles. Write any differences the characters have with one another in the outside circles. Write any similarities the characters have in the middle of both circles. Character Scrapbook - Create a scrapbook for one of the characters in the story. Choose a character from the story. Choose some important events that happen in the story that shapes the character. Draw pictures of these events and explain what happened and how it affected the character. Character Analysis - Keep track of every character in the story and their traits. Write the name of each character in the story in the first column. Write a trait that the character has in the second column. In the third column, write down the page and paragraph number of a quote that proves this trait. Character Development - Choose a character from the story. Write down their initial thought on a topic or situation in the first column. In the second column, write down the event that has an effect on that character’s thoughts. Then, write down the character’s new thoughts on the topic or situation in the third column. Character Cluster - ‑is Cluster Map can be completed in many different ways. Start with a character in the middle triangle. Then, branch out from the character with related topics in the circles. Expand on those topics in the rectangles. Suggestions include: relationship web, traits web, feelings web. Character Sketch - Complete this Character Sketch of any character in the story by writing what the character says, thinks, hates, loves, owns, does or uses. Also include the characters strengths and weaknesses, and where the character has come from in the story, and where the character is going. Setting Graphic Organizers: Setting Elements - Place + Time + Environment = Setting in this Graphic Organizer. Describe the Place that the story takes place in the house graphic. Then, describe the Time in the clock graphic. Finally, describe the Environment in the landscape graphic. Setting Stage - Draw the setting that the story takes place in on the stage in this graphic organizer. Be sure to illustrate the time and place that the story takes place in. Also include the environment of the story, and try to show the tone or mood that the setting creates for the story. Changes in Setting - Identify how the Setting changes throughout the story. In the first column, write down when and where the story takes place at the beginning. In the second column, write down when and where the story takes place at the end. Compare the two to show how the setting changed. Setting Comparison - Compare your Setting with the Setting of the story. In the first column, describe your own Place, Time, Environment, and Mood. Then, do the same for the story’s setting in the second column. Finally, compare each element of the setting. What is the same? What is different? Tone and Mood - Where + When = Tone/Mood in this Graphic Organizer. Describe Where the story takes place in the house graphic. Then, describe When the story takes place in the clock graphic. Finally, describe how both of these elements affect the Tone and Mood of the story. Setting Map - Draw a map to show where the story takes place. Include all the important places from the story as the setting changes. As an extra activity, include routes to each place as it happens in the story. Additionally, include the time for each place on your map. Be creative with your drawing. Past, Present, Future - Describe the Setting as it changes throughout the story. In the Past section, write the setting that took place before the story (flashback). In the Present section, write the current setting of the story. In the Future section, write the setting that will take place after the story (flashback). Elements of Setting - Place + Time + Environment + Mood = Setting in this Graphic Organizer. Describe the Place that the story takes place in the top left box. Then, describe the Time in the top right box. Then, describe the Environment in the bottom left box. Finally, describe the Mood in the bottom right box. Character and Setting Comparison - Compare the Characters in the story with the Setting. Write traits that the character and setting share where the circles overlap. Write traits that the character and setting don’t share in the outside circles. Do this for each character and setting in the story. Setting Analysis - Describe each element of the Setting in detail. Describe the setting, how it relates to the characters, and how the characters are in conflict with the setting. Then, identify the tone and mood of the story, how the setting affects it, and how the story would change if the setting was different. Plot Graphic Organizers: Plot Pyramid – Complete this classic Plot Pyramid graphic organizer by writing the Introduction of the story in the bottom left box. Then, describe the Rising Action, followed by the Climax of the story. Finish up with the Falling Action and the Resolution or Conclusion of the story. Sequence – Describe events from the story in sequence. Start off by writing the Initiating Event, or the event that starts off a chain reaction, in the top box. Follow this with the Steps that directly result from this event in order that they occur. Finish up by writing the Final Outcome of this event. Prediction Chart – In the first column, write down what you predicted, or thought would happen in the story. In the second column, write down what actually happened in the story. Continue this format for each event you predict will happen in the story. Storyboard – Illustrate the plot or an event from the story. Draw or describe in detail each stage in the plot or in an event that takes place in the story. Remember, the order of plot development is: Introduction, Rising Action, Climax, Falling Action, and Resolution/Conclusion. Story Structure – Complete the Story Structure by identifying the Introduction, events of the Rising Action, Climax, events of the Falling Action, and the Conflict and Resolution of the story. Then, identify the theme of the story, as well as the setting of the story (where and when the story takes place). Sequence Chain – Describe up to 9 events from the story in the order that they occur. Write the first event in the first box, followed by the second event in the following box, and so on following the chain. It is not necessary to fill in every box with an event. For an extra activity, draw each event in detail. Prediction Tree – In this Prediction Tree graphic organizer, write your question at the base of your tree. On the trunk, write down your prediction to the answer of the question posed. On the branches, write down evidence from the story to support your prediction. Story Cycle – Describe the Introduction of the story in the top right box. Following the cycle, describe the Rising Action next. Then, include the Climax of the story. Follow this with the Falling Action, and finally with the Resolution of the story. Then, describe how the Resolution relates back to the Introduction. Changes in Plot – Identify how the Plot changes throughout the story. In the first column, write down what happened in the beginning of the story. In the second column, write down what happened at the end of the story. Compare the two to show how the plot changed. Do this for every event in the story. Plot Analysis – Describe the Introduction and identify the Point of View. Describe the Rising Action and what’s being Forshadowed if relevant. Identify the Inciting Force and the Climax. Describe the Falling Action and any Suspense that is experienced. Describe the Conclusion and any Symbolism that is present. Theme Graphic Organizers: Inference Clues – Infer the theme and its meaning from the story by using clues the author gives you. Write down clues to the theme in the circles. Then, find the theme based on these clues and write it in the Inference box. Discuss how you were able to come to that conclusion based on the clues from the story. Theme Prediction – Predict what you think the theme of the story will be based only on the cover art, title, and back cover description. Then, support your prediction. Follow this by writing down evidence from the story as you read along. Finally, write down the actual theme and compare this to your prediction. Theme Chart – First identify the main characters, main conflict, and theme of the story. Then, breakdown the theme of the story by first writing down the beginning of the theme. Follow this by writing the development of the theme, then the climax of the theme. Finish off with the resolution of the theme. Theme Comparison – First, write down a list of themes from the story in the first box. Then, compare these themes by writing their differences in the outside circles, and their similarities in the area where the circles overlap. Finally, write down your conclusions based on this information. Theme Tree – Complete the Theme Tree by first writing the theme on the trunk of the tree. Then, include evidence from the story to support the theme on the branches of the tree. Evidence can be in the form of quotes, paraphrasing, descriptions, and drawings. Theme Contrast – This graphic organizer helps with identifying the Theme and not getting it confused with the Plot or Main Idea of the story. Contrast the theme with the plot or main idea by comparing them and listing ONLY their differences in the two columns. Theme Connection – Connect the Theme of the story with Real Life. First, identify the theme of the story and write it in the center triangle. Then, write down examples of the theme from the story in the circles. Finally, write down examples of the theme as they appear in real life in the rectangles. Changes in Theme – Identify how the Theme changes throughout the story. In the first column, write down the theme in the beginning of the story. In the second column, write down the theme at the end of the story. Compare the two to show how the theme changes. Do this for every theme in the story. Theme Identifier – Get help identifying the Theme of a story by answering the questions. Start off by describing what happens in the story. Then, identify the most important event in the story. Explore the characters by identifying how they change and what they learn. Finally, determine what the author is trying to tell you. Theme Analysis – Identify the Theme, analyze its development, and summarize key supporting details. First, write down what you think the author wants you to understand in the triangle. Then, include supporting evidence in the circles. Finally, tell how the author communicates the theme in the rectangles. Conflict Graphic Organizers: Conflict Dissection – Complete this graphic organizer by filling in each quadrant. In the first box, identify the characters of the story. In the next box, identify the time and place of the story. In the third box, identify the problem that takes place in the story. In the last box, identify the solution to the problem. Problems and Solutions Chart – Identify the Problems and possible Solutions with this graphic organizer. First, identify the problem in the first box. Then, identify possible causes of the problem, followed by possible effects of the problem. Finally, identify any possible solutions to the problem based on this information. Conflict Commentary – Summarize the Conflict by first identifying how the conflict starts. Then, identify possible causes of the conflict. At the top, identify the climax of the conflict, or how it comes to a head. Then, identify possible effects of the conflict. Finally, identify the outcome of the conflict. Internal or External Conflict – Determine whether the conflict in the story is internal or external. Internal conflict: a character experiences two opposite emotions or desires. External conflict: a character struggles with an outside force. Find examples of the conflict in the story and add them to the column that most fits. Conflict Type Chart – In the first column, find examples from the story that shows Character against Character. In the second column, find examples of Character against Nature. In the third column, find examples of Character against Self. And finally, in the fourth column, find examples of Character against Society. Conflict Timeline – Complete the Conflict Timeline graphic organizer by breaking down the events for the conflict. Write down the stages of events for the conflict in the boxes on the timeline. Each stage should follow the order in which it took place in the story. Opposing Forces Comparison – Compare two opposing forces in the story with this graphic organizer. First, identify the two forces you will be comparing. Then, identify the struggle between these two forces. List the differences between the two forces in the outside circles. List the similarities where the circles overlap. Conflict Map – Outline the Conflict in the story with this Conflict Map graphic organizer. First identify the conflict of the story in the top box. Then, identify the two forces that are in conflict with each other, and what happens when these two forces collide. Finally, identify the resolution of the conflict. Cause-Effect-Consequences – Identify the cause, effect, and consequences of the Conflict as it appears in the story. First, identify the conflict in the story in the top box. Then, in the chart, identify the causes of the conflict, the effects of the conflict, and the consequences of the conflict. Conflict Analysis – Determine what type of conflict the author created: Character vs. Character, vs. Nature, vs. Self, vs. Society, vs. Supernatural, or vs. Technology. Answer the questions to lead to the Conflict Statement. Here, identify the type of conflict, what the character wants, and why they can’t have it. Bonus Graphic Organizers: Story Map – Map out the story with this graphic organizer. First list the Characters and describe the Setting of the story in the top boxes. Then, identify the Problem that takes place. Move on to outlining the Major Events of the story. Finally, explain the Resolution and Theme in the bottom boxes. Story Elements – Identify the Story Elements in this graphic organizer. Identify the Theme, Setting, and the Relevance of the Setting. Then, identify the Characters in the story with their names, traits, and function in the story. Move on to identify the Conflict that takes place, the Plot, Climax, and Resolution. Plot and Conflict Analysis – Analyze the Plot and Conflict that takes place in the story. First, identify the Protagonist (hero) of the story, and the Antogonist (villain). Then, identify the Conflict, and what type it is. Complete the Plot Pyramid next. Finally, explain how the Conflict is resolved in the end. Event Map – Breakdown an Event from the story with this graphic organizer. Write down an event from the story in the middle circle. Then, record What happened, When it happened, Where it happened, Who was involved, How it happened, and Why it happened or Why it is important in the circles. Figurative Language – Complete this graphic organizer by finding examples of the selected Figurative Language from the story. Write down examples of Metaphor, Simile, Hyperbole, Imagery, Personification, and Symbolism used in the story. Then, write the page number where you found each example.
Author Ibby Resources
Rating
Tags Study, Skills, Character, Setting, Plot, Theme, Conflict, Literary, Device