


3D Paper Bird Craft Template – Cut, Color, Display


- Grades
- Pre-K–3, Elementary
- Pages
- 4
- File type
- Preparation
- Print ready


- Subject
- Creative Arts, Art
- Topic
- arts and crafts, paper crafts
- Resource types
- Templates, Teacher Tools, Activities, Crafts
- Preparation
- Print ready
About this resource
What's inside this resource
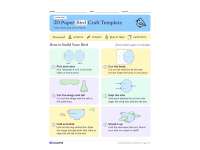
Kids color, cut and fold a paper songbird that stands on its own. The first page lists the materials (scissors, crayons, glue or tape, and card stock for a sturdier bird) and shows six numbered steps, each with a line drawing: pick and color, cut the body, cut the wings and tail, snip the slits, fold and slide the wings through, and fold out the base tabs so the bird can perch on a desk or shelf.
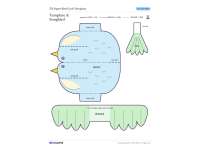
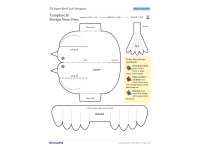
Two template pages hold the same three pieces: a folded body with a beak, eye and chest patch, a feathered wing strip and a five-feather tail fan. Template A comes with its songbird markings drawn in. Template B is an outline for designing a bird from scratch, with color ideas from an American robin, a male northern cardinal and a blue jay. A key at the top of each template shows solid lines to cut, dashed lines to snip and dotted lines to fold.
The last page, Meet My Bird, turns the craft into a short writing task. Children check four things about their finished build, fill in a five-line Bird ID card (name, colors, home, food and song) and write a sentence comparing their bird with one of the real birds.
- Grades K–3: spring and bird units, art time or early finishers
- Four pages: directions, two templates and a writing page; no answer key is needed
- Two printables: one in color and one in black and white
Related resources
More resources teachers may find useful
24 related resources were found using this product's title, contributor, categories and tags.

In the classroom
Teaching tips & learning objectives

Learning objectives
Follow a sequence of picture-supported directions to build a 3D model.
Tell cut, snip and fold lines apart using a line key.
Use the colors and markings of real birds to plan a design.

Teaching tips
Print the template pages on card stock, as the directions suggest, so the finished bird stands up more easily.
Remind students to color both sides of every piece before cutting, since the body folds and both sides show.
Read the line key aloud with younger children; words like slit, slot and tab may be new to them.

Skills covered
Following directions: six short steps, each paired with a drawing, take students from coloring to a standing bird.
Fine motor practice: children cut along solid lines, snip short dashed slits and fold on dotted lines.
Observing real birds: the color ideas card names features such as the robin's orange chest and the blue jay's black necklace.
Good to know
Questions teachers ask about this resource
What supplies are needed?
Scissors, crayons, and glue or tape. The directions page recommends card stock for a sturdier bird.
Will the bird really stand up?
Yes. Two base tabs fold out from the body so the finished bird can stand on a desk or shelf, and the build check on page 4 asks students to confirm it does.
What is the difference between Template A and Template B?
Template A is a songbird with its markings drawn in. Template B has the same pieces in outline so students can design their own bird, with color ideas from a robin, a cardinal and a blue jay.
Is there an answer key?
No. The build check, Bird ID card and Real bird match are each student's own observations about the bird they made.

No reviews yet
Downloaded this resource? Tell other teachers how it went.
Resource details
Concepts & topics
Core concepts
 Core concepts
paper craft
3D model
birds
following directions
fine motor skills
spring activity
 Topics
Explore more
Categories this resource belongs to
Explore related searches
More to explore
You may also like


