
To successfully upload your products, you can follow this guide. If you have any questions, do not hesitate to reach out to us!
Table of Contents
- Step 1: Contributor Admin
- Step 2: Fill out the Product Details.
- Step 3: Media & Files
- Step 5: Standards (Optional)
- Step 6: Description of Product
- Step 7: Finish Up!
Step 1: Contributor Admin
After login into your account, you have the option to Add Product on the top right corner of the page.

Step 2: Fill out the Product Details.
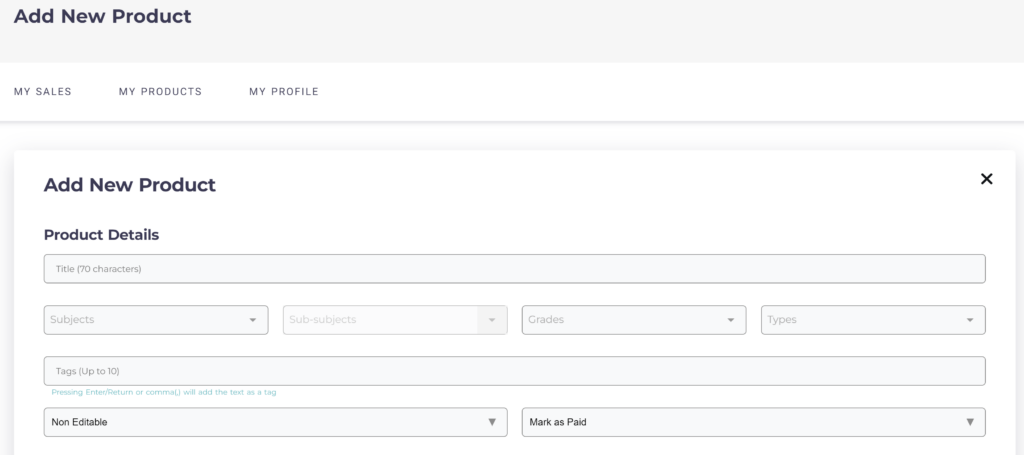
Title:
An effective title will represent very closely what the product is about. The words used will help identify the product. The title needs to be original to Teach Simple.
Subject:
Click on the icon and a list of subjects will appear. Please choose the subject under which your product will most likely be filed under. You can choose more than one if it applies.
If cross-curricular, choose the main subject for which your product was created and then the other subjects for which the resource may be used.
Sub Category:
Click on the icon and a list of subcategories will appear under each of the subjects chosen. Please choose the subcategories under which your product will most likely be filed. You can choose more than one if it applies.
Grade:
Please select up to 4 grades where your resource may be used.
If your resource is not grade specific, please scroll to the bottom of this menu and select that option.
If your product is of ART, PE, or MUSIC, and is not specific to a grade, please select Not Grade Specific.
Type:
This relates to the nature of your product. If you scroll to the bottom you will find options to effectively categorize your product.
Tags:
These are the words you would use to find your product. Effective tags will help customers find your products. You can write up to 10 words by hitting “enter” after each one. When in doubt, use the words from your title!
Mark As Paid or Free:
When you click on this icon, it provides you with the option to upload a free product. Free products are provided to members who are in the try-out phase.
Step 3: Media & Files
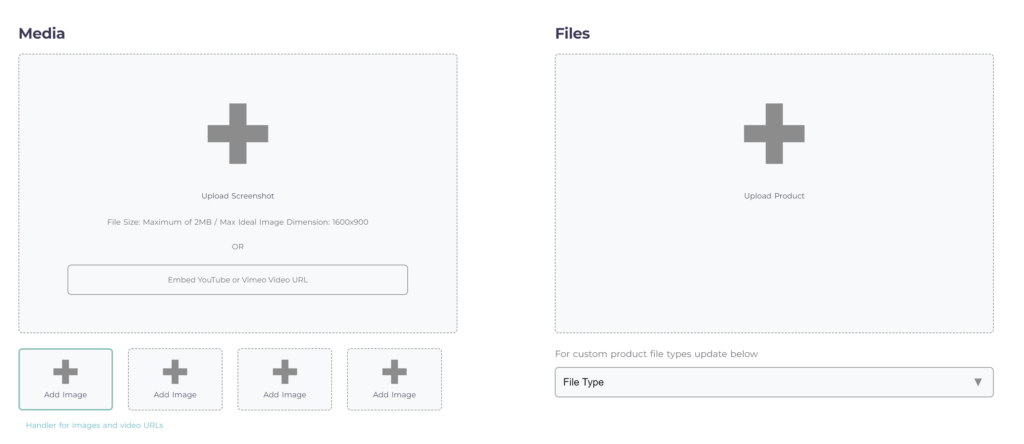
Media:
This section is for you to upload screenshots of your product by clicking on the plus sign or drag and drop the files of the screenshots. You can also embed the URL of videos.
When you click on the plus sign, your file explorer will open and you choose the screenshot to be uploaded by double-clicking on the name of the file or dragging and dropping it in the media space. The screenshot will then appear in the first small square with a plus sign. Please upload a minimum of 4 screenshots and none of them with any previews or watermarks on them. Our watermark will appear once the product is saved into our system.
Files:
This section is for you to upload your products. Under that section, please specify the TYPE of file you are uploading.
Step 5: Standards (Optional)
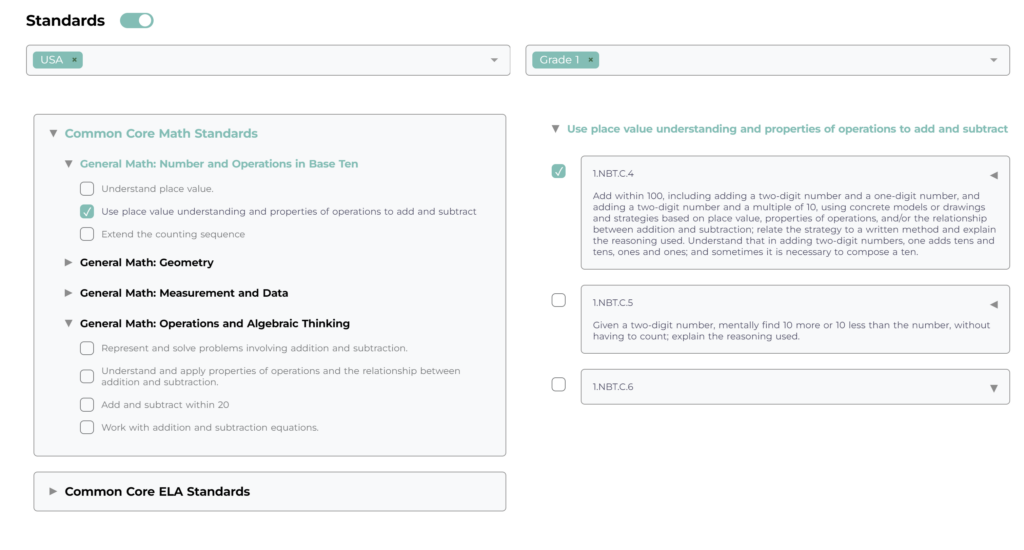
Common Core: The CCSS for the subjects and grades you chose above will appear for Math or ELA. Once you click on either, the options will continue to expand downward and to the right side of the page. For example, in the image below, the subject was Math and the grade was Grade 1. Once you click on the Math CCSS, you have to choose the appropriate standard for which the specific ones will appear on the right side to choose the applicable one.
Step 6: Description of Product
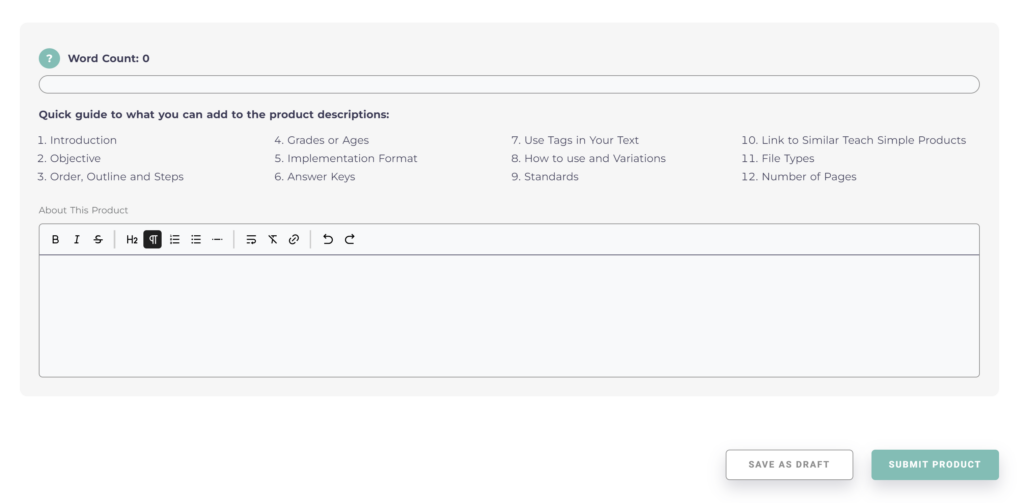
About this Product: In this section, please type an original description of your product and why it would be beneficial to use it
- You can also describe the elements included in your product. For example PowerPoint presentation pages, the assessment included, answer key included, eBook number of pages, Unit topics, number of worksheets or activities, etc. Whichever applies to the detailed description of your product.
- This description needs to be original to Teach Simple with a minimum of 200 words in order to be submitted.
Step 7: Finish Up!
Save as Draft: If you begin the uploading process but cannot finish it, just click on this icon and you can get back to finishing later!
Submit Product: Click on this icon when you are ready to upload your product. Once you submit, your product will be checked for content originality.
- The system verifies content originality by searching for duplicate and AI-created content. Once you submit your product, it goes through these inspections before reaching our team for review.
- You’ll first see a “checking” status following submission, which will subsequently become “rejection” or “pending”. The system doesn’t account for descriptions within the Teach Simple marketplace in case you have a series of similar products. This mechanism speeds up approvals due to fewer edits needed on all submissions.
- If your product does not meet requirements, it will be rejected for you to revise and resubmit.
- If all requirements are met, it will then appear on your My Product page ready to be approved.